How to collaborate on labeling with DDS?
How to collaborate on labeling with DDS?
Introduction
To assist users in building high-quality datasets, DDS (DeepDataSpace) provides rich and convenient annotation tools for computer vision tasks such as object detection, image segmentation, and pose estimation.
Currently, we have implemented annotation features for rectangles, polygons, and human keypoints. In addition, DDS provides two entry points for different usage scenarios:
Quick Mode: Experience the ready-to-use annotation tool, supporting upload, annotation, and result export, suitable for individuals to complete annotation tasks with small batches of data.
Collaborative Mode: Help users create annotation projects and workflows, supporting task distribution, progress monitoring, quality checking, etc., which is suitable for team collaboration on large-scale annotation tasks.
This tourial mainly focuses on how to use the Collaborative Mode for annotation.
Collaborative mode design
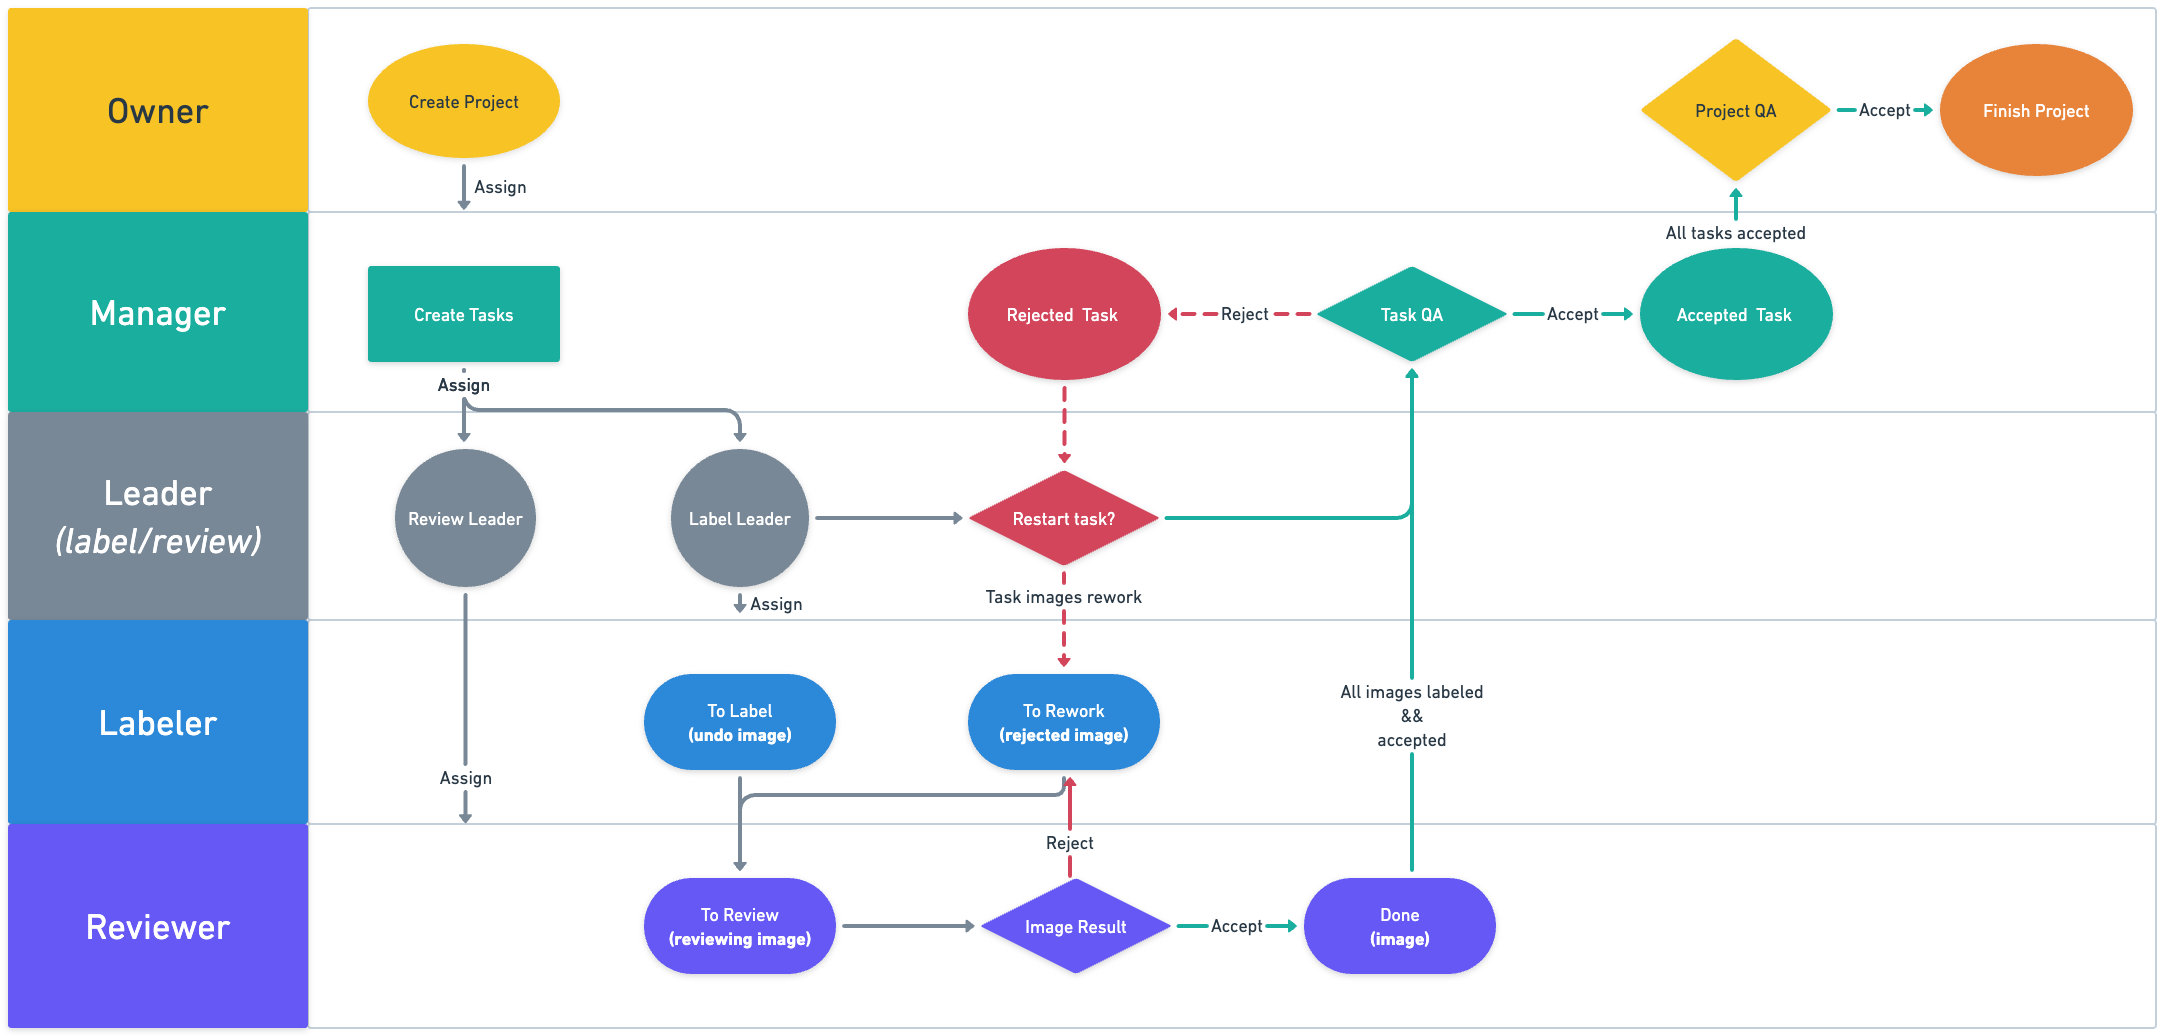
The collaborative mode workflow is shown in the following diagram:

Project
A project is a container that includes all labeling tasks for one or more datasets. The project owner is responsible for creating the project and can:
- Bind one or more datasets as the target object for labeling tasks;
- Set the project workflow;
- Split tasks based on dataset or image numbers;
- Set whether the project requires approvers;
- Set project administrators to be responsible for task allocation and management;
- View and manage the status of the project.
Task
Tasks are the components of a project, and a labeling project can be divided into multiple labeling tasks. You can perform the following operations for each task:
- Assign different roles of the task to specific collaborative accounts;
- Different role accounts have different task permissions;
- View the progress of the task;
- View and manage the status of the task.
Role description
- Owner:Responsible for creating the project and assigning project managers.
- Manager:Responsible for configuring the workflow for task initialization, and assigning labeling and reviewing team leaders. They are also responsible for conducting sample checks on tasks and managing task results.
- Label Leader:Responsible for assigning labeling personnel. If the task is rejected, they can negotiate with the project manager to determine the next steps.
- Review Leader:Responsible for assigning reviewing personnel.
- Labeler:Responsible for specific labeling tasks.
- Reviewer:Responsible for reviewing the labeling results of the labelers.
Collaborative account
Collaborative labeling mode relies on the account system, and currently only supports account creation through the command line.
1. Generating account
# When the DDS services have been launched
# 1. Generating an account, a password will be automatically assigned.
ddsop useradd user1
# 2. Set the account attribute to "staff" (grant permission to create projects).
ddsop useredit user1 --staff y
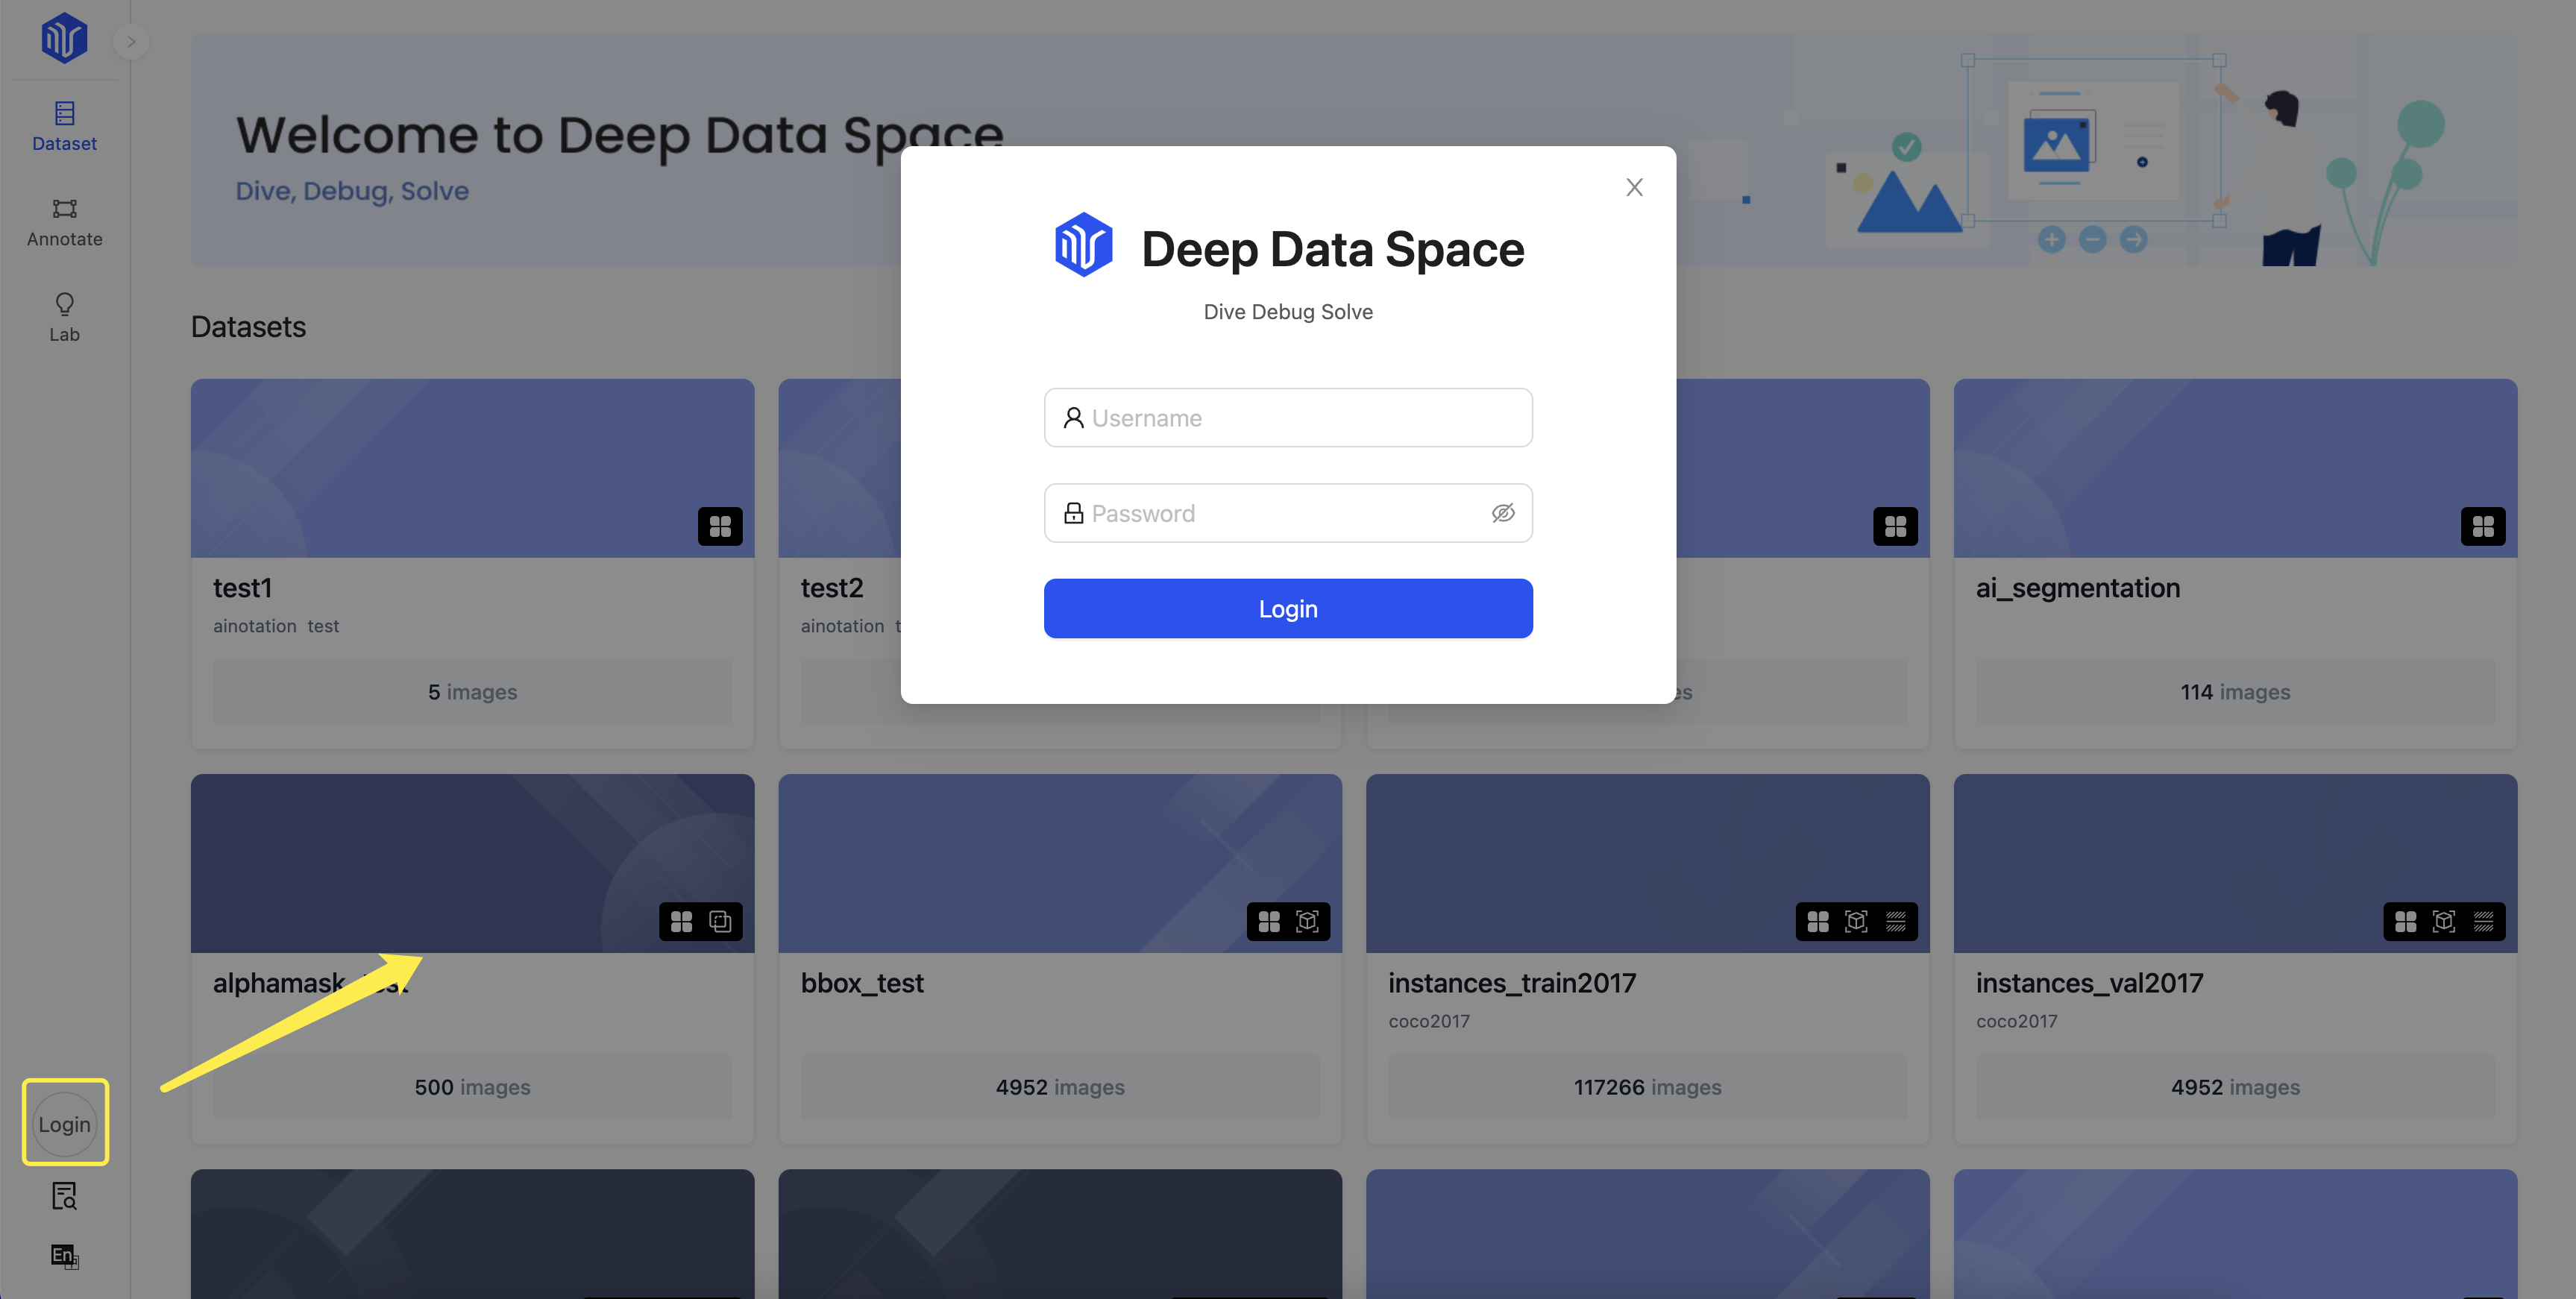
2. Login

Enter collaborative labeling mode
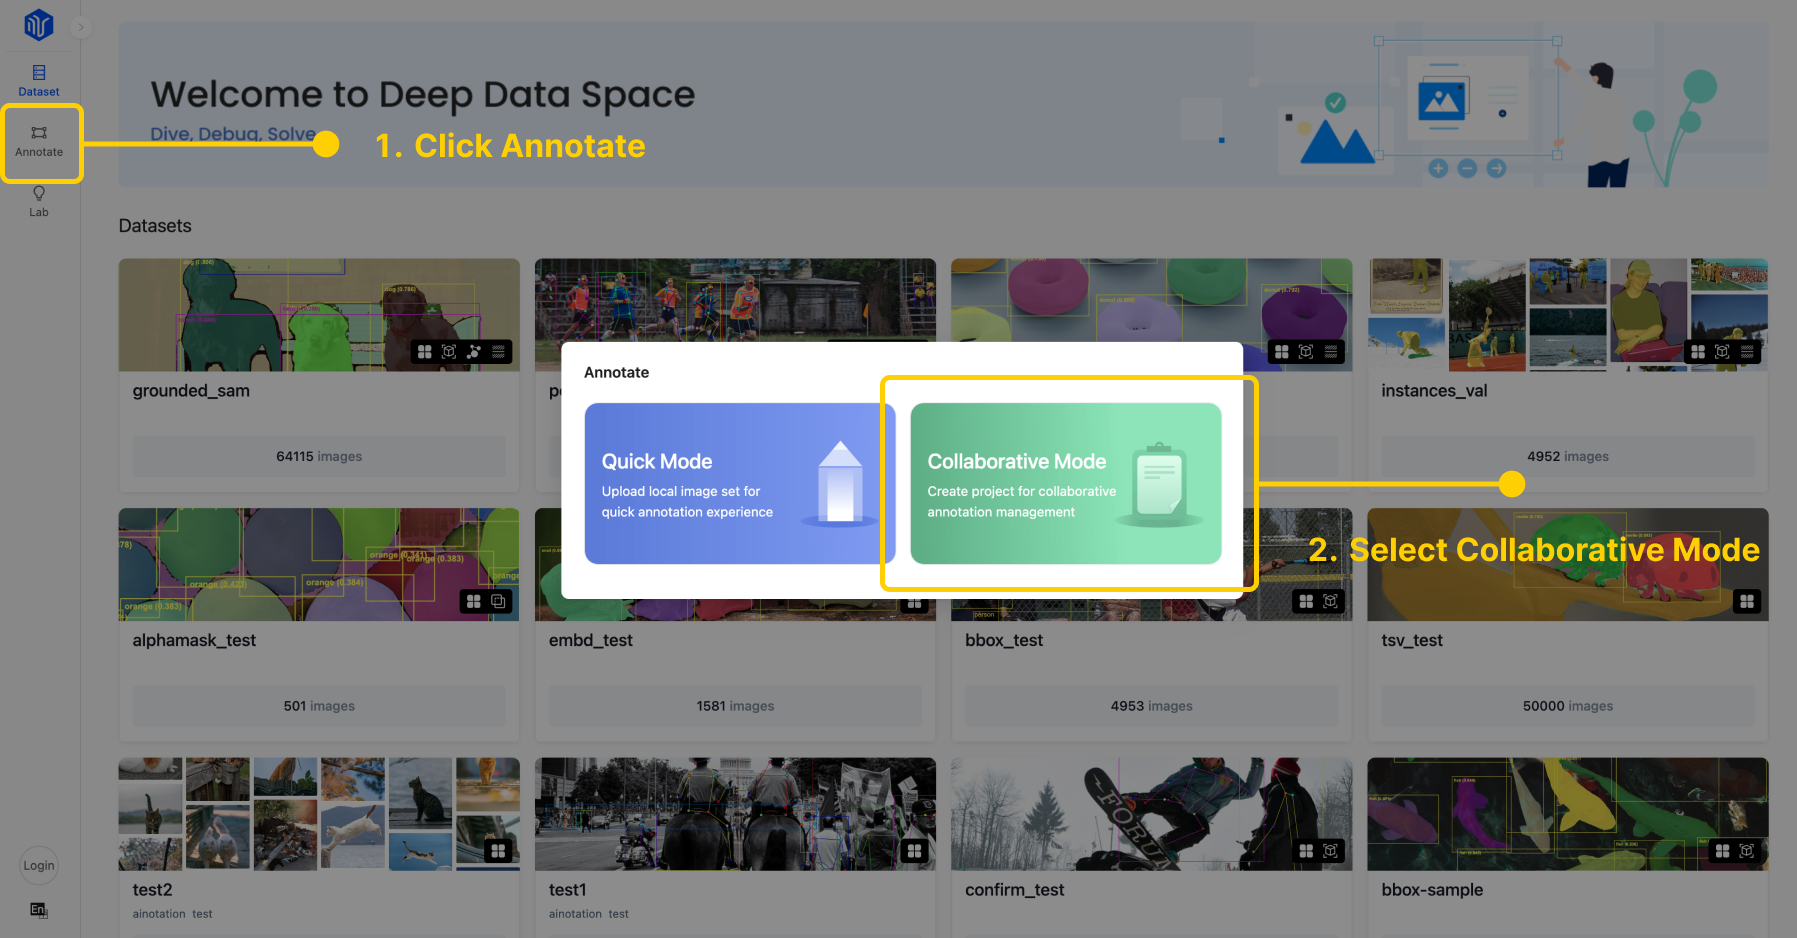
To access the annotation tool, click on the Annotate in the navigation bar of the DeepDataSpace homepage and select the Collaborative Mode.

Project settings
1. Create project
Only accounts with the "staff" attribute have the authority to create projects.
- Click
+New Projectbutton - Fill in the basic information form for the project.
- Project Name
- Description
- Datasets
(You can select one or more datasets as the labeling target for the project) - Pre Label
(You can fill in the name of an existing annotation set in the dataset. If the system matches it, the corresponding annotation set will be imported as pre-annotations.) - Categories
(Fill in the label categories. During labeling, you can choose one of these categories for labeling.) - Project Managers
- Click
Next Step - Fill in the workflow information form (if you don't set yourself as the manager, you can submit the form directly without filling it in).
- Click
Submitto create project
2. Set project workflow
The project manager is responsible for setting the workflow and can set it during the
create projectprocess or by clicking theinitbutton for the corresponding project after it has been created.
The specific form items are as follows:
- Choose the task splitting method
- Split by dataset
- Split by image count
- Review configuration
- No reviewers
- One reviewer
3. Project Status
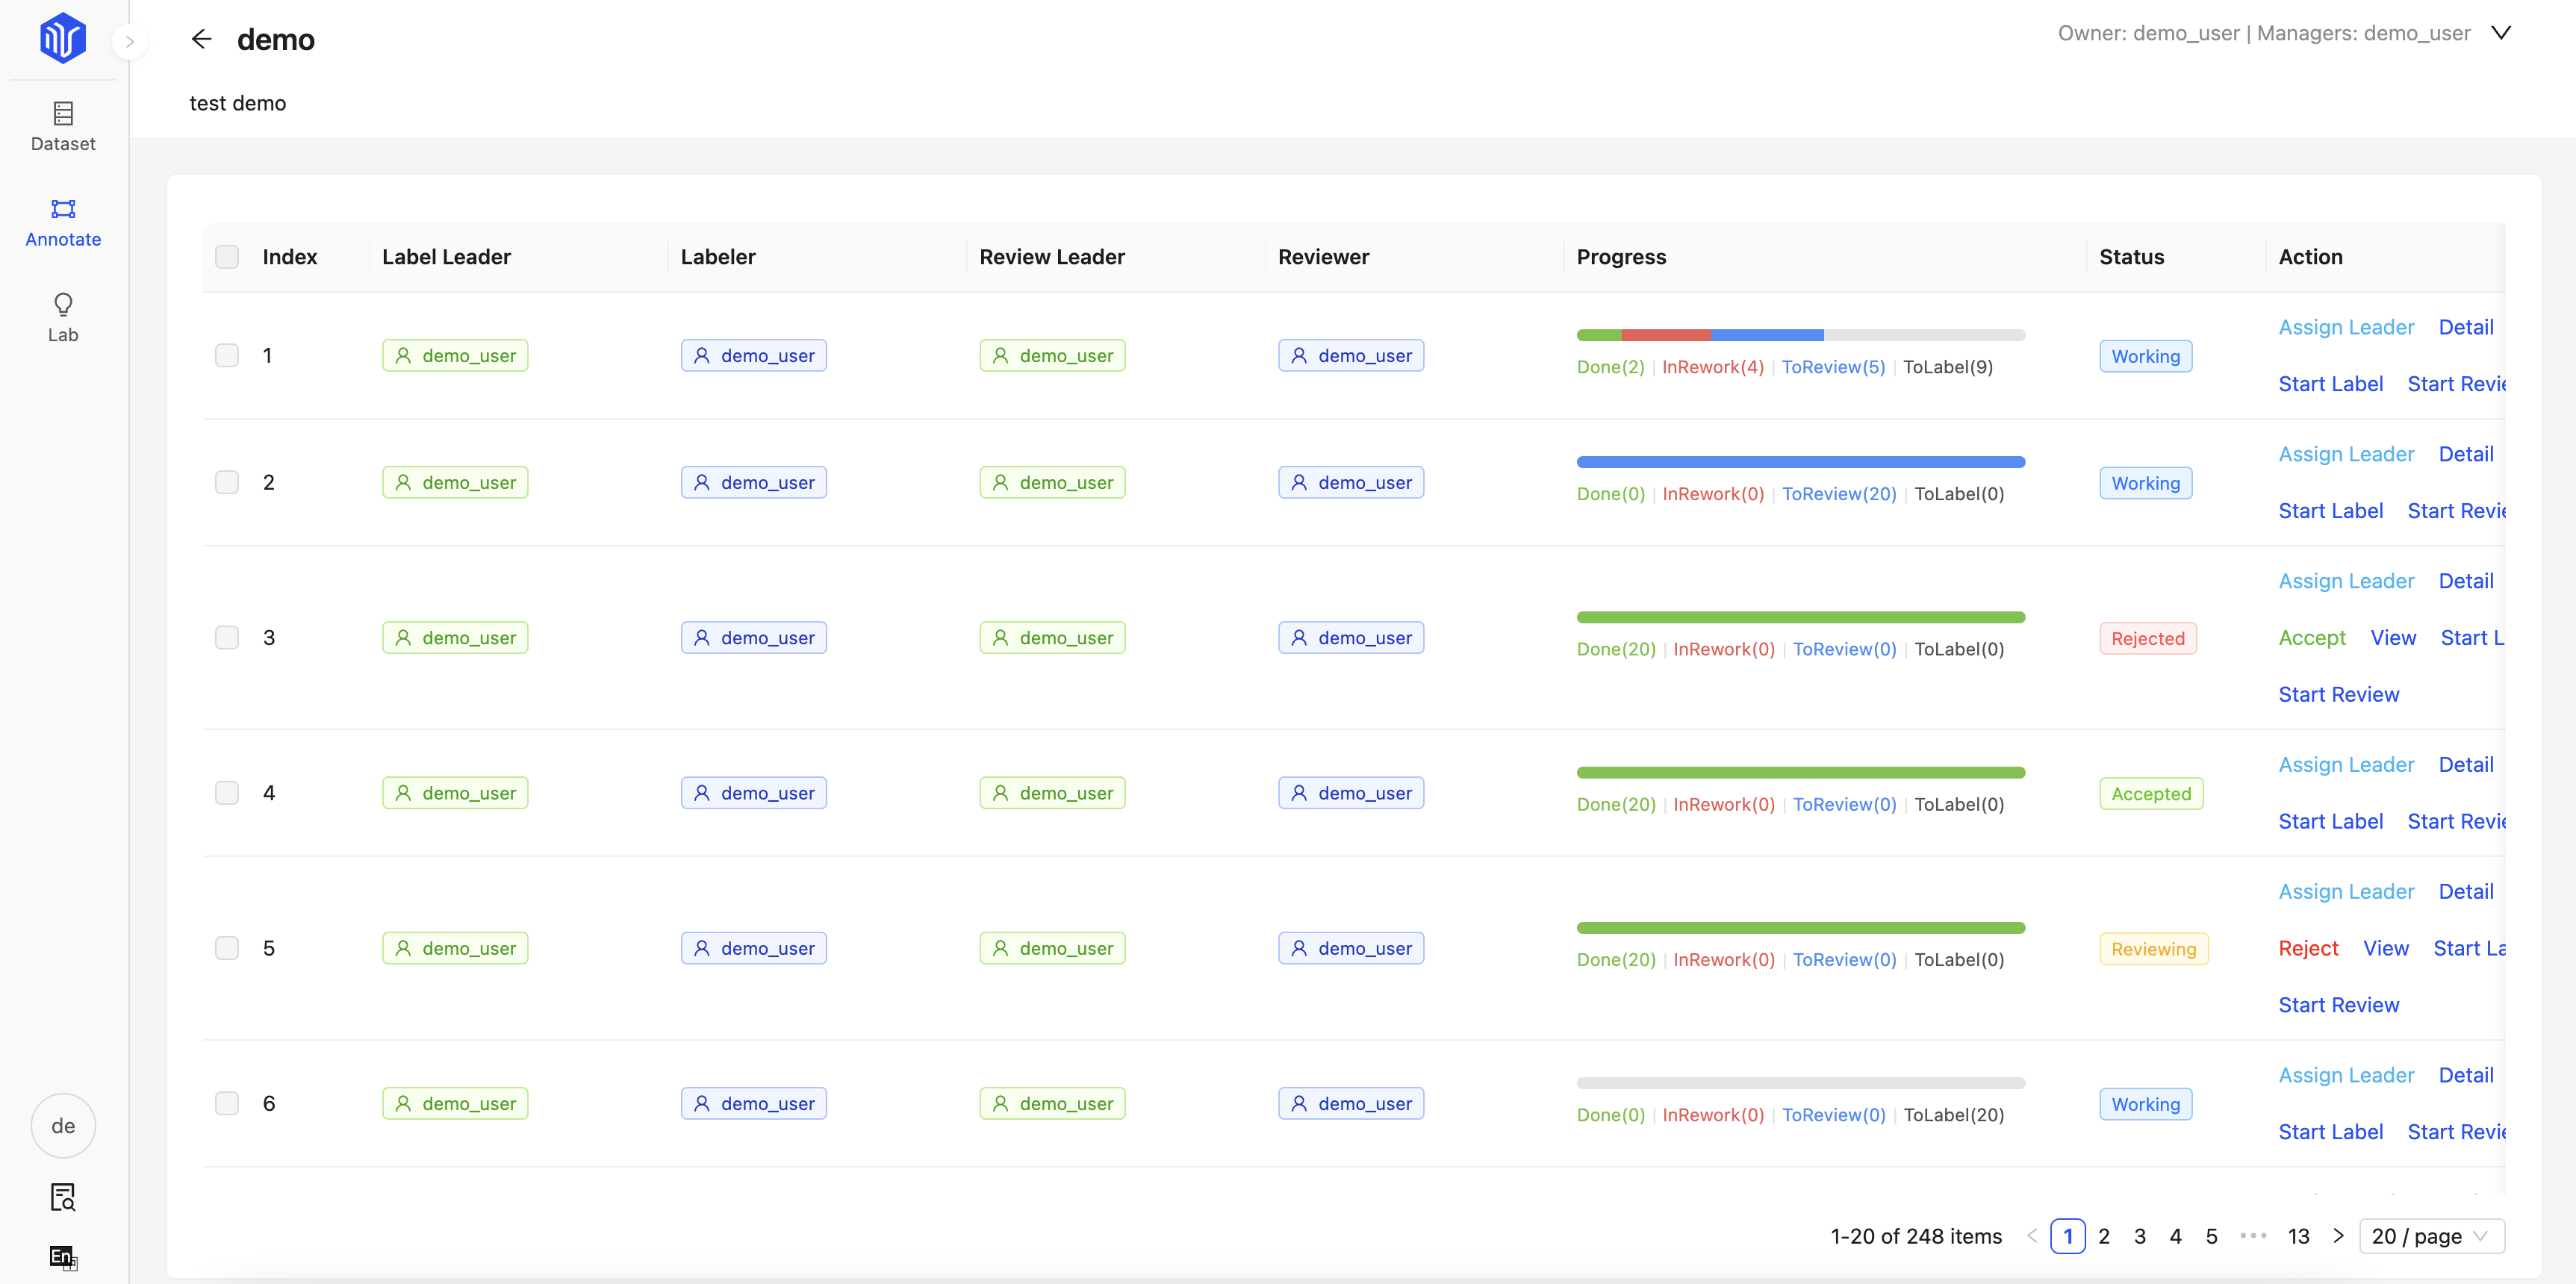
After successfully creating a project, you can view the overall task progress and project status on the project list page.
There are six project statuses:
- Waiting: The project has been created but the workflow has not been set up.
- Initialing: The project is currently splitting tasks based on the workflow settings.
- Working: The project has entered the task assignment and execution phase.
- Reviewing: The project automatically enters the
Reviewingstatus when all tasks are completed. - Rejected: The project owner can transition from
ReviewingtoRejected. - Accepted: The project owner can transition from
ReviewingtoAccepted.
The demonstration of the project creation process is as follows:
Task management
1. Task assignment
After successfully initializing a project, you can click on Details for a specific project to enter the project's task list.
- Manager:Responsible for assigning labeling and reviewing team leaders.
- Label Leader:Responsible for assigning labelers, who can begin labeling work once they have been assigned.
- Review Leader:Responsible for assigning reviewers, who can begin reviewing work and review specific labeled objects.
2. Annotate
As a
Labeler, you can view all of your assigned tasks on the task list page.
Enter the task workspace
When the task is in the Working status, you can click Start Labeling to begin labeling.
After entering the labeling task details page, you can see that your current role is "Labeler". There are four tab items at the top of the page, which display the corresponding task objects according to their status:
- To Label:Objects that have not yet been labeled.
- To Review:Objects for which labeling results have been submitted.
- In Rework:Objects whose labeling results have been rejected by the reviewer.
- Done:Objects whose labeling results have been approved by the reviewer.
Start label
On the To Label tab, click on Start Label to enter the annotation editor.
The specific instructions for using the annotation tool can be found in the documentation:Annotation Tool
After completing the labeling, click on the Save button in the upper right corner to submit the labeling results.
After successful submission, the system will automatically redirect you to the next labeling object for labeling.
To change the labeling result
On the To Review tab,You can click on the label target, click on Edit, and modify the existing label result.
Rework
If you have objects that have been rejected, you can click on To Rework at the top to re-label the rejected objects.
3. Review
As a
Reviewer, you can view all of your assigned tasks on the task list page.
Enter the task workspace
When the task is in the Working status, you can click Start Review to begin review.
After entering the labeling task details page, you can see that your current role is "Reviewer".
Start Review
Click on Start Reviewing to enter the annotation editor in review mode.
You can review the label result of the object, and submit the review result:
- Reject:This will send the object back to the labeler for re-label, and the object will be moved to the
In Reworkqueue. - Accept:This will pass the review, and the object will be moved to the
Donequeue.
After successful submission, the system will automatically redirect you to the next object for review.
4. Task Status
There are a total of 6 statuses for a task:
- Waiting: The task is waiting to be assigned.
- Working: The task has been assigned to labelers and is in the labeling & reviewing phase.
- Reviewing: All objects in the task have been labeler and reviewed (if one reviewer is set up) and the task automatically moves to this status.
- Rejected: The project manager can manually review the task results and move the under review task status to
Rejected. - Accepted: The project manager can manually review the task results and move the under review task status to
Accepted.
Task progress
On the task list page, you can see the specific progress of each task:

Reassigning Personnel
- The project manager can reassign the label and review team leaders.
- The label and review team leaders can reassign the labeler and reviewer, and the progress of the original task will be transferred to the newly assigned personnel.
Reject Task
- When all objects in the task have been labeled and reviewed (if one reviewer is set up), the task automatically moves to the
Reviewingstatus. - At this point, the project manager can perform a random sampling check on the task. If the overall quality of the task is not high, the project manager can
rejectthe task. - After being
rejected, the label team leader can negotiate and agree on the result. Once the result is agreed upon, all objects in the task will be moved to theIn Reworkqueue and need to be re-label and reviewed."
Note
- The Owner can assign all roles to themselves for quick experience.
- The above scenarios are based on the situation where one reviewer is set up in the workflow. If no reviewer is set up, there is no need to assign a reviewing team leader and reviewer.
- If you have multiple roles, you can switch roles at the top of the workstation to use the operational privileges of different roles.
