How to annotate images with DDS ?
How to annotate images with DDS ?
Introduction
To assist users in building high-quality datasets, DDS (DeepDataSpace) provides rich and convenient annotation tools for computer vision tasks such as object detection, image segmentation, and pose estimation.
Currently, we have implemented annotation features for rectangles, polygons, and human keypoints. In addition, DDS provides two entry points for different usage scenarios:
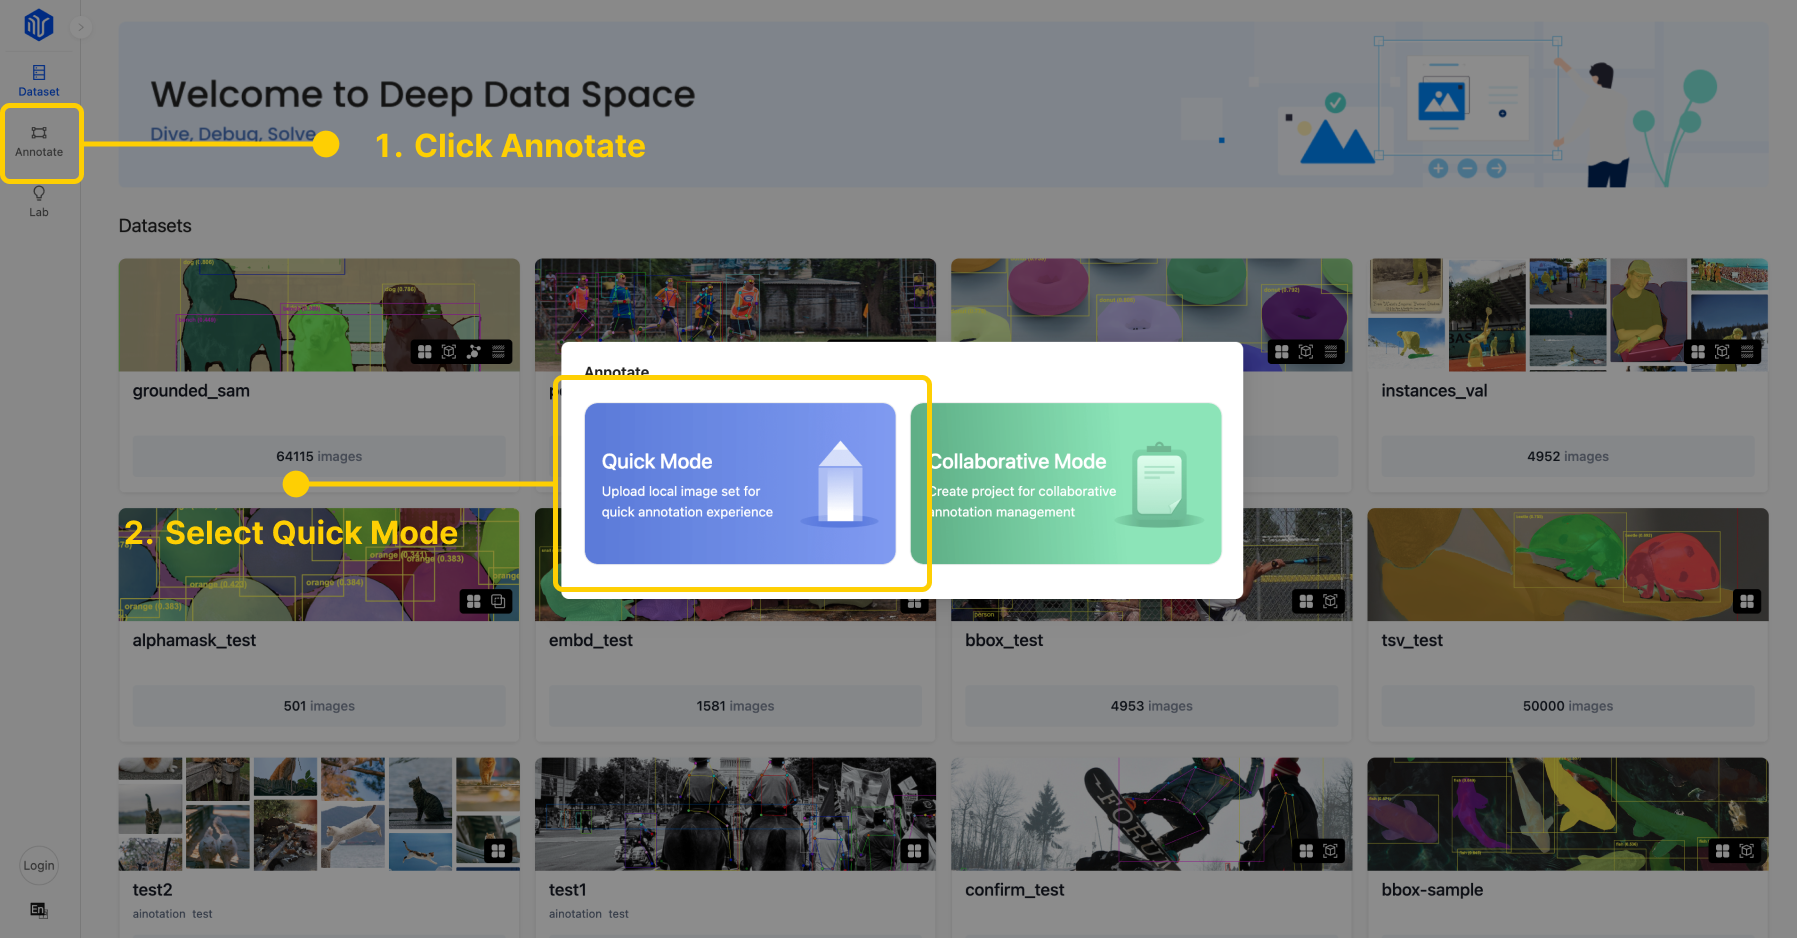
Quick Mode: Experience the ready-to-use annotation tool, supporting upload, annotation, and result export, suitable for individuals to complete annotation tasks with small batches of data.
Collaborative Mode: Help users create annotation projects and workflows, supporting task distribution, progress monitoring, quality checking, etc., which is suitable for team collaboration on large-scale annotation tasks.
This tourial mainly focuses on how to use the Quick Mode for annotation.
Init Annotation Tool
To access the annotation tool, click on the Annotate in the navigation bar of the DeepDataSpace homepage and select the Quick Mode.
Before you start annotating, you need to import local images and add categories labels in the popup shown. Once done, click the OK button to submit the information.
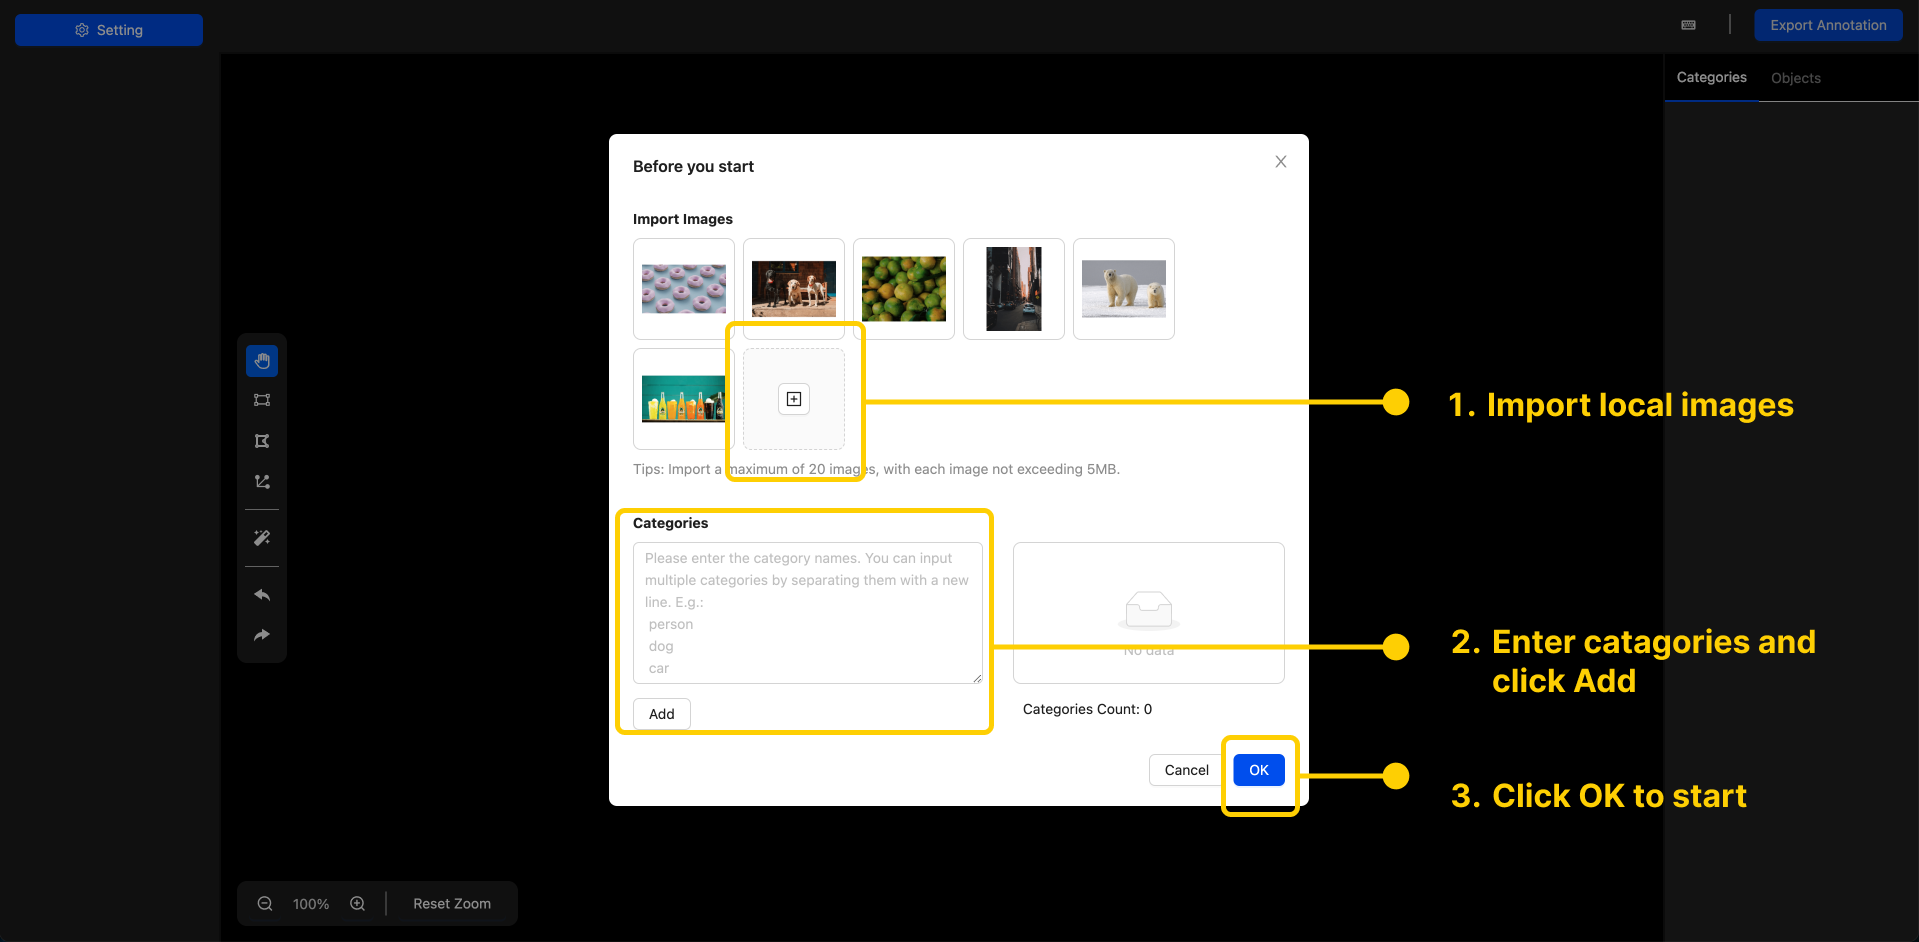
Images: Considering the limitation of browser memory, each image should not exceed 5MB, and the total number of imported images should not exceed 20.
Categories: You can enter category names in the textarea on the left side. Click "Add" to add a single category, or you can enter multiple classes at once by using line breaks for batch addition.
Tips
All the imported or entered information exists only within the current browser session. The platform does not upload or save this information, so you don't need to worry about data security and privacy.
Start Annotating
Interface
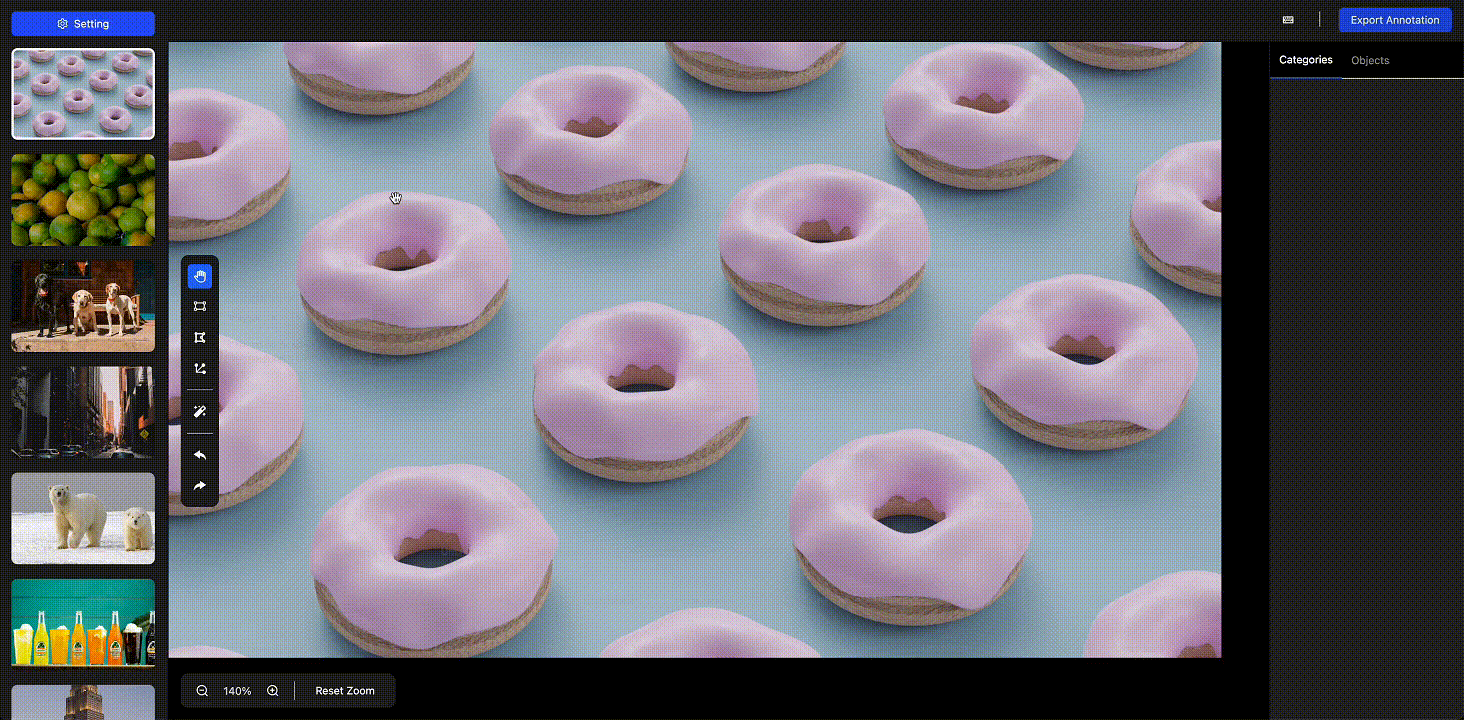
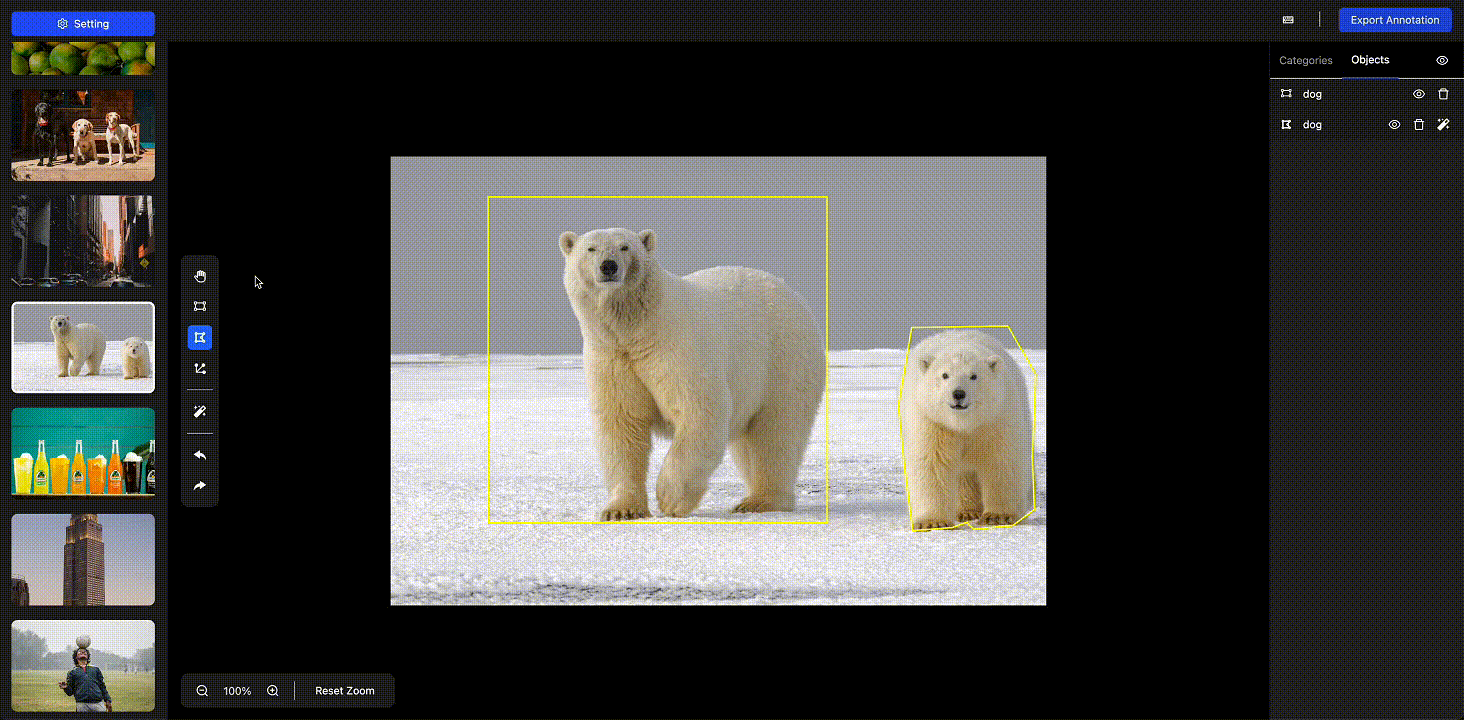
The interface of the DDS annotation tool consists primarily of the following components: Image options list (left side), the annotation workspace (central), and the annotation list (right side).
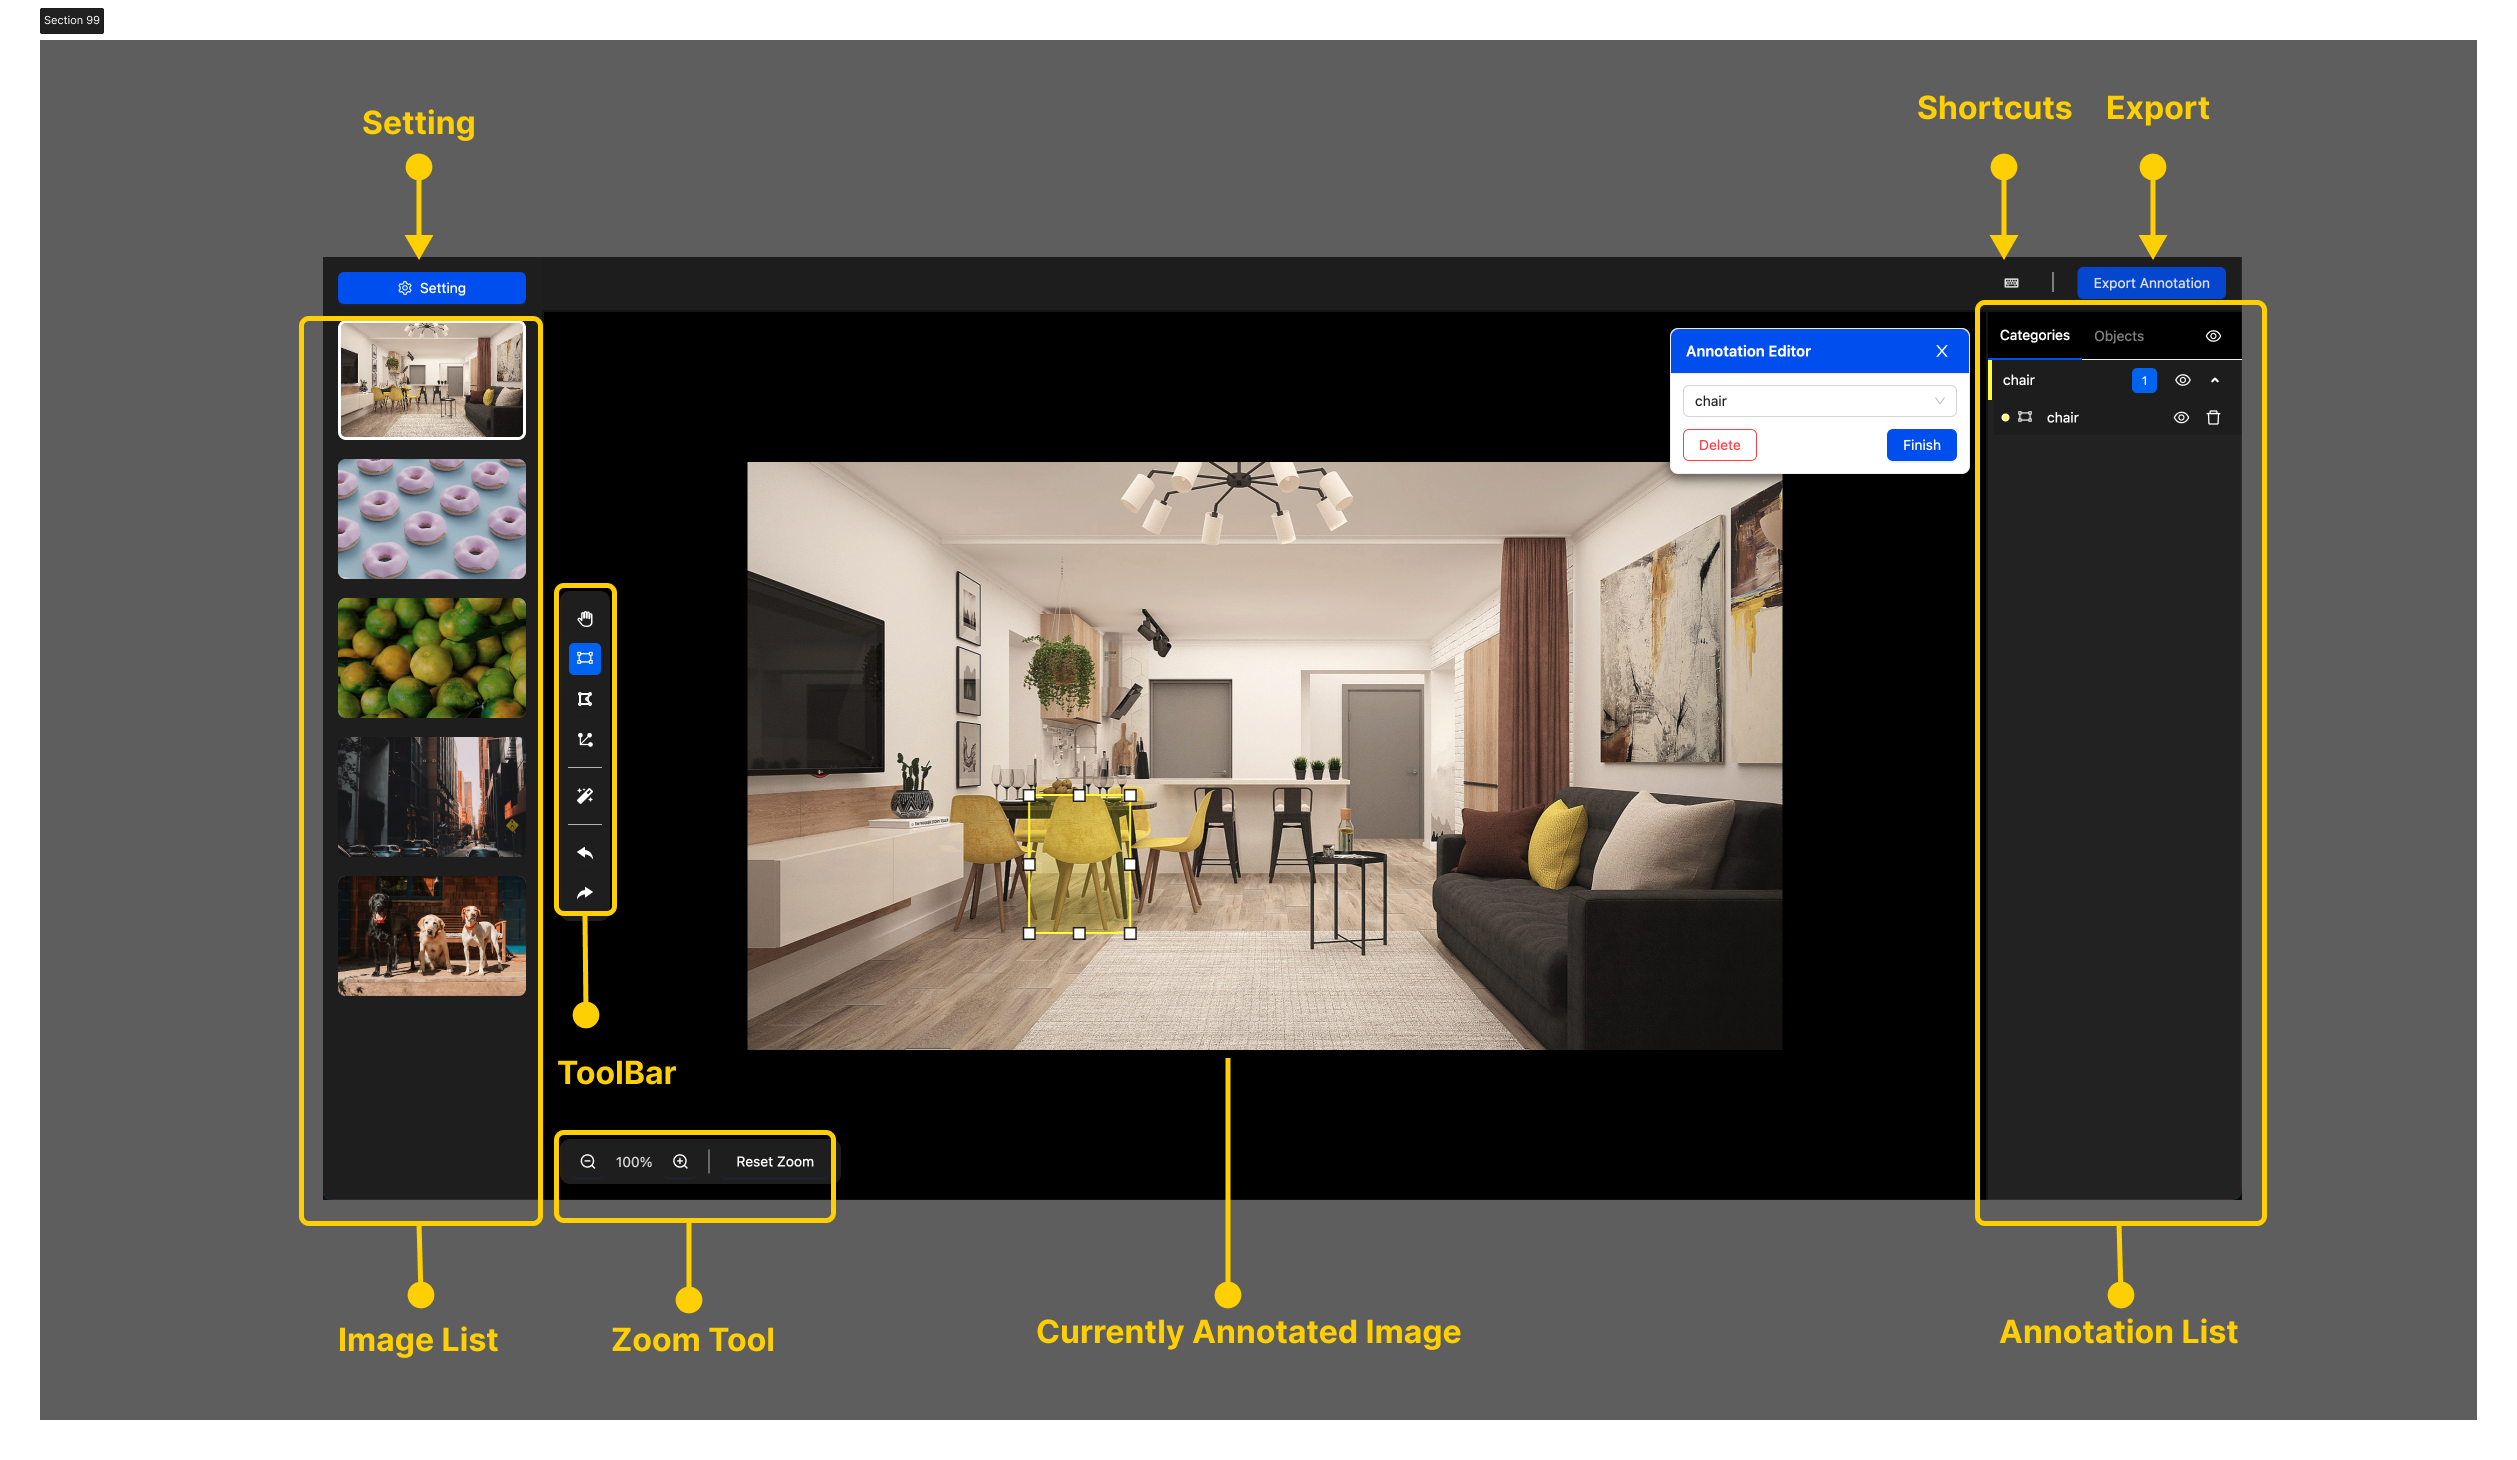
Image List: It contains all the images imported by the user. By clicking on any image, you can switch the currently active image for annotation. If you need to import more images, you can click the "Settings" button at the top and import them from your local device.
Annotation Workspace: It includes the current annotated image, toolbar, zoom tool, and annotation editor. In this area, you can perform various annotation operations and edits.
Annotation List: It displays all the existing annotation instances. You can choose to collapse or expand the list based on categories or display them in the order of creation. Within the list, you can select, hide, delete, and perform other operations on the instances.
Create an Annotation
Rectangle Tool
The Rectangle tool is particularly useful for tasks such as object detection, where you need to identify and localize objects within an image using rectangular bounding boxes.
- Select the Rectangle tool from the annotation toolbar.
- Click and drag the mouse cursor on the image to define the starting point and size of the rectangle.
- Release the mouse button to complete the drawing of the rectangle.
- Adjust the position and size of the rectangle by clicking and dragging its edges or corners, as needed.
- Assign the appropriate category to the annotated object using the annotation editor.
- Clicking on the blank area allows you to create rectangles continuously.
Polygon Tool
The Polygon tool is a versatile annotation tool that allows you to create custom-shaped polygons to outline and annotate regions of interest in an image.
Here's how you can use the Polygon tool:
- Select the Polygon tool from the annotation toolbar.
- Click on the image to define the vertices of the polygon. Each click will add a new vertex to the shape.
- Continue clicking to create additional vertices and form the desired polygon shape.
- To complete the polygon, either click on the first vertex.
- Adjust the position and shape of the polygon by clicking and dragging its vertices.
- Clicking on an edge allows you to add a new vertex, while clicking on a vertex allows you to delete it.
- Assign the appropriate category to the annotated region using the annotation editor.
- Clicking on the blank area allows you to create polygons continuously.
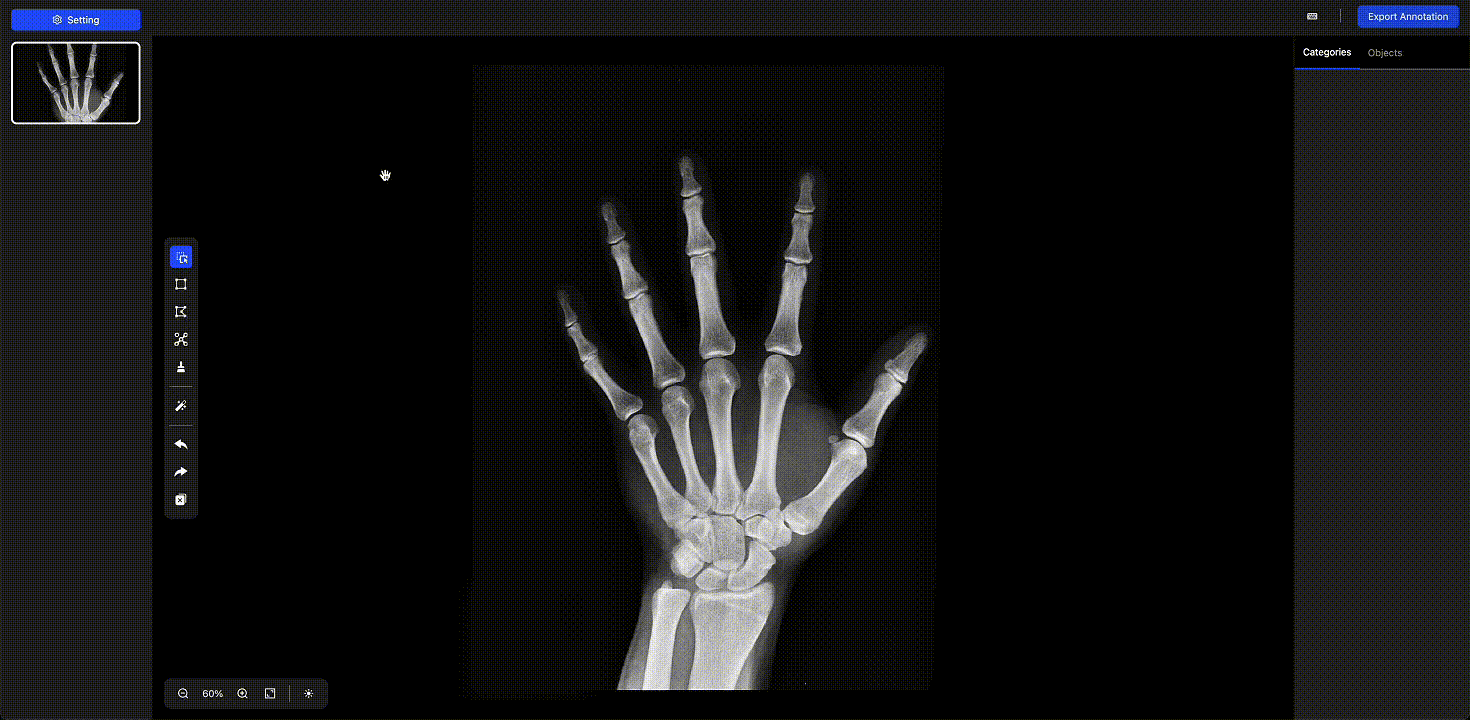
Skeleton Tool
The Skeleton Tool is a powerful feature in the annotation toolkit that allows users to create keypoints with structures for objects in an image. This tool is particularly useful for tasks such as pose estimation.
- Select the Skeleton Tool from the annotation toolbar.
- Click and drag the mouse in any area to create a 17-point template for human body keypoints.
- Select any keypoint and drag it to the corresponding position.
- Change the visibility of keypoints in the annotation list on the right side.
- In the Annotation Editor, choose a category for the annotation to complete the creation.
- Clicking on the blank area allows you to create skeletons continuously.
Tips
Currently, this feature only supports the use of a 17-point human skeleton template. In the future, we plan to provide support for integrating other skeleton templates, allowing users to choose different skeleton structures based on their specific needs.
Mask Tool
The Mask Tool is used to create pixel-level segmentation annotations, which own higher precision compared to the polygons.
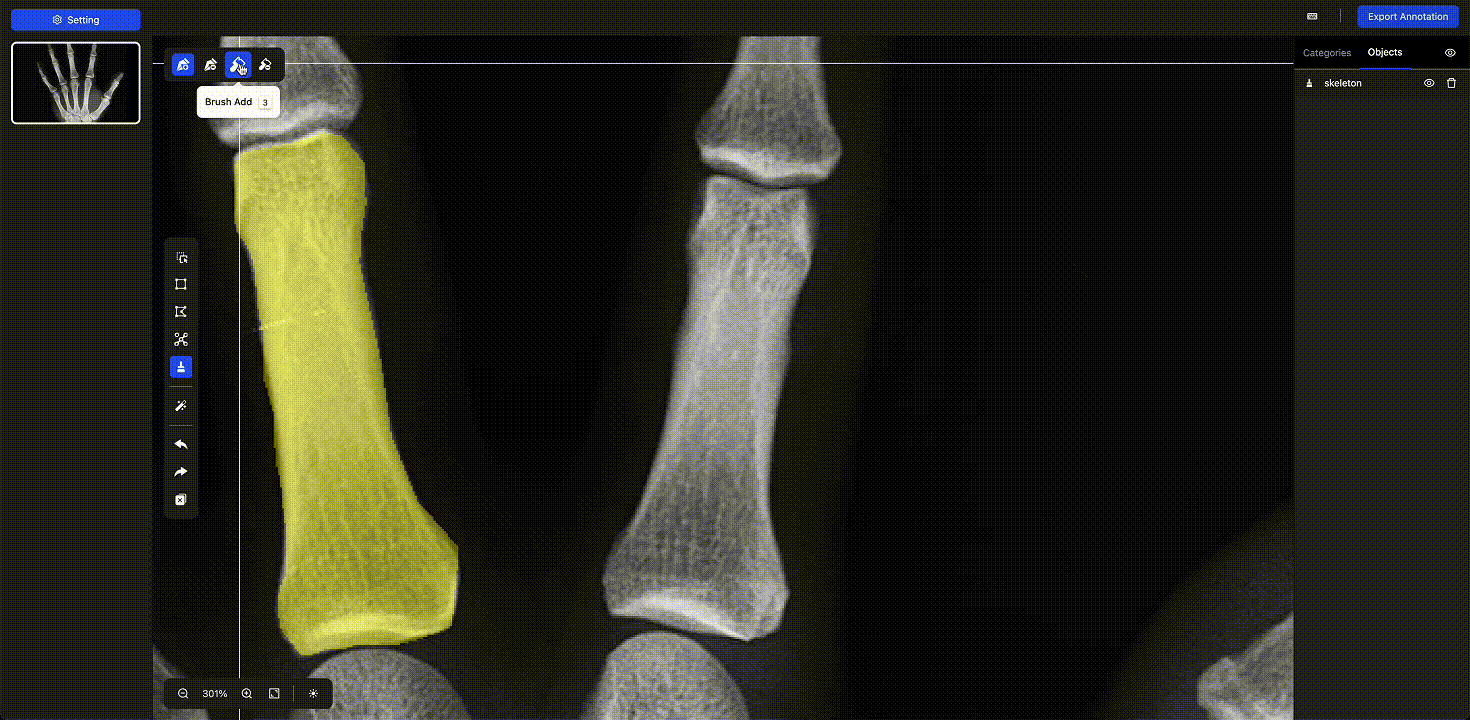
To utilize this feature, please adhere to the following steps:
- Select the Mask Tool from the annotation toolbar.
- Choose either the pen tool or the brush tool from the sub-toolbar located at the top left corner.
- Utilize the pen tool to craft a closed path, thereby generating a new mask. Alternatively, you can employ the brush tool to fill an area and create a fresh mask.
- Both tools offer add and remove editing modes, enabling you to make precise adjustments to the existing mask.
- Once you have finished editing, select a category for the mask in the annotation editor on the top right corner and click "Finish" to complete the creation.
- Click on other areas to create continuous mask segmentation.
Edit an Annotation
To edit an existing annotation, follow these steps:
- Select the Drag/Select tool from the toolbar to enter the editing mode. Then, click on the instance in the image or directly click the item of the annotation list to enter the editing state of individual annotation.
- Now, you can perform editing operations such as dragging and resizing on the annotation.
- When the annotation is selected, an annotation editor popup will appear in the top right corner. You can modify the category in this editor and click "Finish" to apply the changes.
Other Operations
Dragging the base image: In the editing mode, click on the blank area of the image and drag the mouse to move the base image. In other modes, you can also press and hold the Space key to enter the image dragging state.
Undo / Redo: You can use the Undo tool to cancel the previous operation or the Redo tool to restore the state before the last undo.
Zooming: You can use the zoom tool in the bottom left corner to adjust the image size or scroll the wheel of mouse.
Keyboard Shortcuts
All operations are equipped with keyboard shortcuts. You can click on the keyboard icon at the top to view the shortcuts.
| Type | Keys | Description |
|---|---|---|
| Tool | r | Rectangle Tool |
| p | Polygon Tool | |
| s | Skeleton Tool | |
| m | Mask Tool | |
| d | Drag / Select Tool | |
| General Action | a | Activate / Deactivate Intelligent Annotate |
| Ctrl+z / Command+z | Undo | |
| Ctrl+Shift+z / Command+Shift+z | Redo | |
| View Action | h | Hide / Show current selected annotation |
| Ctrl+h / Command+h | Hide / Show all annotations of the selected category | |
| Ctrl+Shift+h / Command+Shift+h | Hide / Show all annotations | |
| = | Zoom In | |
| - | Zoom Out | |
| 0 | Reset zoom to fit screen | |
| Space | Pan the image by dragging mouse | |
| Annotate Action | Enter | Complete the annotation creation or modification |
| Backspace / Delete | Delete current selected annotation | |
| Esc | Cancel the selection or discard the annotation in progress |
Export Annotation Results
Note
Since the browser session window does not permanently save the uploaded images and annotation results, it is necessary to export the annotation results before leaving the page.
Click the "Export Annotation" button located at the top right corner of the workspace to export. Currently, the tool supports exporting in COCO format, while other formats is under planning.
What's Next
With DDS's quick annotation mode, you can quickly grasp the basic usage of the DDS annotation tool and complete annotation tasks for small batches of data.
If you are not satisfied with manual annotation alone, we encourage you to explore our intelligent annotation tool, which leverages advanced algorithms and interactive workflows to significantly improve your annotation efficiency.
If you need to design more complex annotation workflows, enable collaborative annotation among multiple users, or handle large-scale datasets, we recommend to use DDS's Collaborative Annotation mode, which provides additional functionalities and flexibility to meet advanced annotation requirements.